camsdocsample.github.io
| Home | Stylized Version |
About aText
What is aText?
aText is a text expander tool that lets users automate repetitive aspects of their work by turning frequently used text and images into “Snippets.” Users can easily apply Snippets of any length inside a text box by typing a short, user-defined abbreviation.
What will this tutorial cover?
This beginner level tutorial teaches readers how to navigate and use aText’s interface and basic functions.
Table of Contents
Overview
Groups
Snippets
Insert elements
Back up aText data
Overview
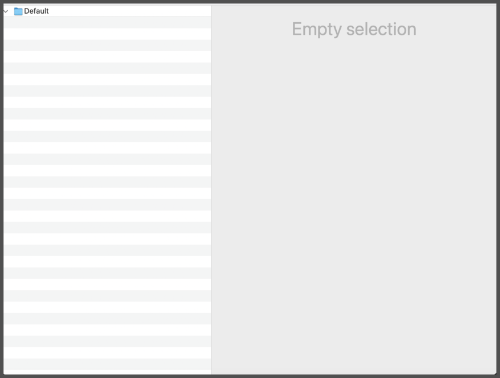
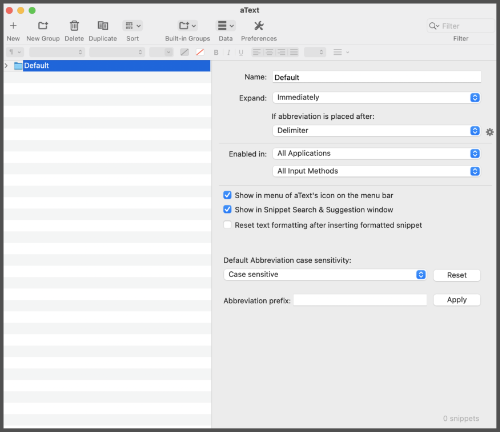
The default aText interface is shown below.

Tip: aText also allows for toolbar customization and includes a visibility toggle for a more simplified view of the workspace.
Main Functions
 Create a New Snippet
 Create a New Group
 Delete selected Snippet(s) or Group(s)
 Duplicate selected Snippet(s) or Group(s)
 Sort Groups or Snippets
 Access Built-In Groups included with aText
 Perform various actions with aText Data
 Adjust overall aText Preferences
Features
Look up specific Snippets using the Filter search

Format Snippet contents with the Rich Text Editor toolbar

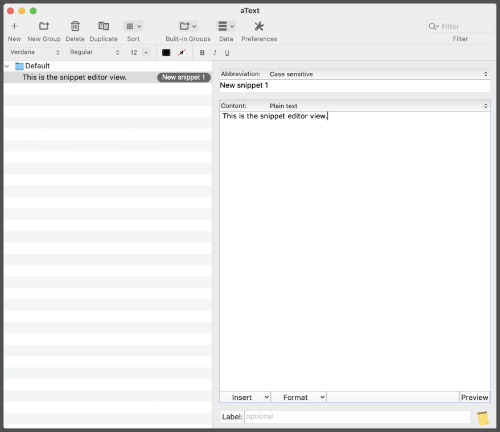
Main Panels
Left: Panel for Groups and Snippets
Right: Panel for Group Settings and Snippet Content Editor
Group settings view:
Snippet editor view:
Groups
In order to create a Snippet, a user must first create a Group. Groups allow the user to compile, organize, and manage Snippets. While individual Snippets cannot adhere to specific text expansion settings, different Groups can have different text expansion settings.
Create a new Group
-
Click New Group
-
Type the name of the Group in the “Name” field
-
Adjust the text expansion settings as needed or take no additional action to accept default settings
Move, sort, and delete Groups
Multiple Groups can be arranged manually or alphabetically by using the Sort function. Groups cannot be nested in other Groups.
Move an entire Group manually
-
Click the folder
 next to the Group that will be moved
 -
Hold and drag the Group to the desired spot
-
Look for the blue line to indicate the correct placement is selected
-
Release the hold

Sort all Groups alphabetically:
Click Sort > Select “Sort Groups alphabetically”
Delete a single Group:
-
Click the folder
or title of the Group to be deleted -
Click Delete
-
Choose “Delete” on the popup warning
Delete multiple Groups
-
Ensure that each Group to be deleted is sorted back-to-back
-
Click the folder
or title of the top or bottom Group -
Hold shift and click on the additional Groups to be deleted
-
Release the shift button
-
Click Delete
-
Choose “Delete” on the popup warning
Snippets
Snippets are the primary function of aText and support a significant amount of customization. Users can tailor snippets with Static text, custom fields, automations, or various combinations of each.
Note: A Snippet cannot exist outside of a Group. If there are no Groups when the user chooses to create a New
Create a new Snippet
-
Click New
-
Assign an abbreviation to the Snippet in the “Abbreviation” field to the right
-
Create the Snippet’s content in the content box
Optional:
-
Adjust the content type using the up-down arrows
 to the right of the “Plain text” selection
 -
Apply desired formatting using the Rich Text Editor above or from the “Format” drop down menu below
-
Click the “Preview” button at the bottom right to see a demonstration of the Snippet
Additional notes on Abbreviation behaviors: The default sensitivity will be set to “Case sensitive” for each new Snippet. This can be adjusted for an individual Snippet by clicking the up-down arrows
Alternatively, this setting can be adjusted for an entire Group by opening the Group’s settings and choosing a sensitivity option under “Default Abbreviation case sensitivity”. Changing this Group setting will only apply to new Snippets added to the Group; the original case sensitivity of any pre-existing Snippets in the Group will not be updated.
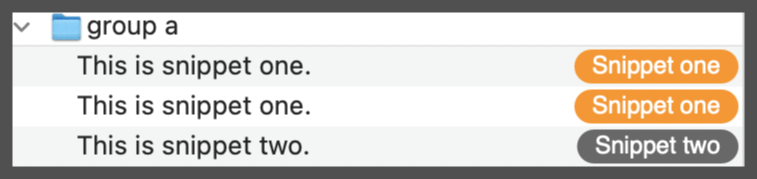
If a Snippet’s abbreviation is left blank, there will be no way to access the content of the Snippet in a text editor and ultimately deactivates the specific Snippet.
When a Snippet’s abbreviation is a duplicate of an existing abbreviation, each duplicated name will appear in a selection box when activated (however, the content of a Snippet can be repeatedly duplicated without issue).

In the Group/Snippet Panel, duplicate Snippet abbreviations are denoted in orange.

Move, sort, and delete Snippets
Like Groups, Snippets can be moved manually. However, there are additional sorting options that can be used to manage Snippets via the Sort function.
Move a single Snippet manually:
-
Click and hold the Snippet in the Group/Snippet Panel
-
Drag the Snippet to the desired placement
-
Look for the blue placement line to ensure the correct location is selected
-
Release the hold
Tip: When moving a Snippet into another Group, hold the Snippet over the Group title or folder ![]() for about 2 seconds to auto-expand the Group contents. Once placed, the Snippet will adhere to that Group’s expansion settings.
for about 2 seconds to auto-expand the Group contents. Once placed, the Snippet will adhere to that Group’s expansion settings.
Sort all Snippets:
Click Sort > Select desired sorting method
⚠️ Warning: Sorting will impact every Snippet, regardless of what Group they are in. ⚠️
Delete a single Snippet:
-
Click the name of the Snippet to be deleted
-
Click Delete
-
Choose “Delete” on the popup warning
Delete multiple Snippets at once:
-
Ensure that each Snippet to be deleted is sorted back-to-back
-
Click the top or bottom Snippet
-
Hold shift and click on the additional Snippets to be deleted
-
Release the shift button
-
Click Delete
-
Choose “Delete” on the popup warning
Insert elements
Users may desire to add additional custom fields or automations to a Snippet in order to maximize its output. Elements from the “Insert” menu can either be used as standalone Snippets or to enhance Snippets with static content.
Add an automated or editable element to a Snippet:
-
Create a new Snippet or open an existing Snippet
-
Click the “Insert” tab located in the bottom left corner of the Snippet content editor
-
Hover over the expandable menu items to view the available options

Date - Various date formats
Time - Various time formats
Snippets - Supports inclusion of simple Snippets into current Snippet
Note: a Snippet cannot be added to itself.
Key - Allows the user to define a specific key stroke to be triggered upon activating the expander (i.e. automated deleting, screen reading, special characters, etc.)
Field - Various text field options
Clipboard - Inserts last copied clipboard contents
Image… - Inserts selected image(s)
Cursor - Indicates a specific location for the cursor upon activation of the text expansion
Add link… - Hyperlink selected text in Snippet
Note: Hyperlinking is only available when the Snippet’s content setting is set to “Formatted text, picture”.
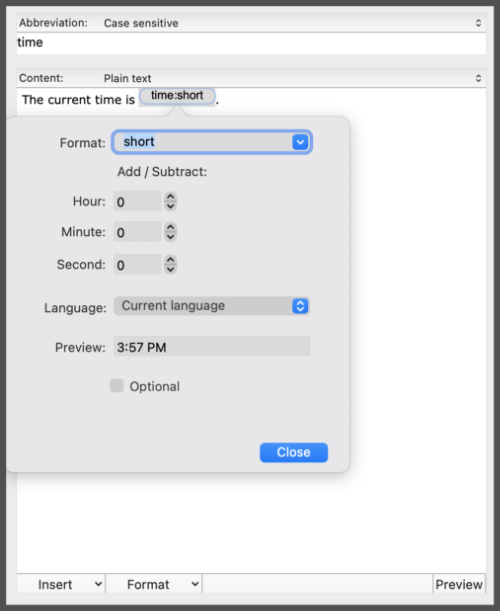
Change the settings of an inserted element
Nearly each element has variables that can be adjusted to customize what the user needs from a particular Snippet. These settings can be accessed by double clicking on the element’s blue bubble in the content box.
Snippet content with an element added:
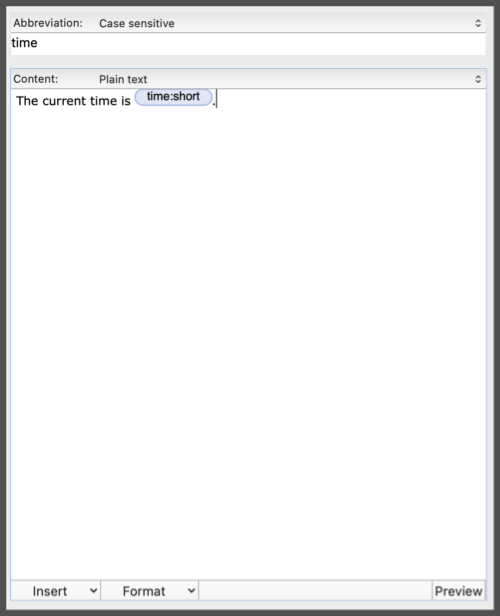
Adjustable variables (shown here: the short format “Time” automation):
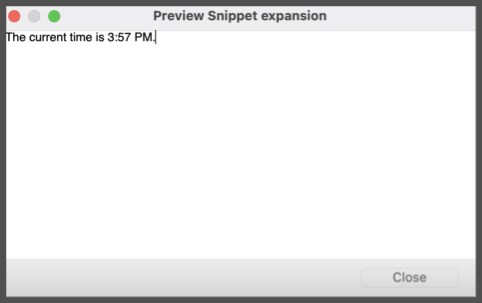
Text expansion preview:
Insert multiple elements in one Snippet
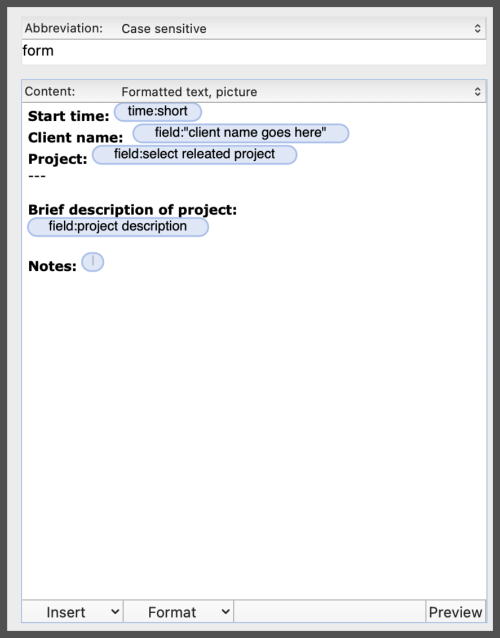
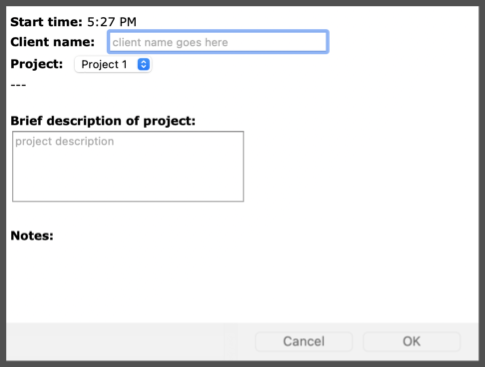
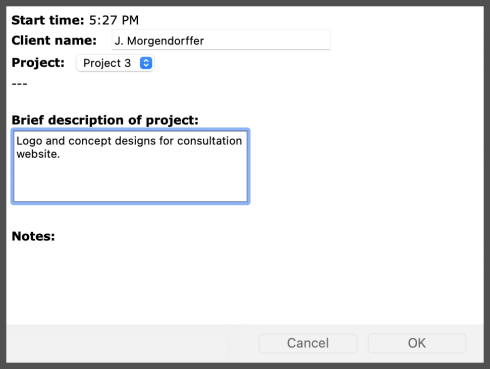
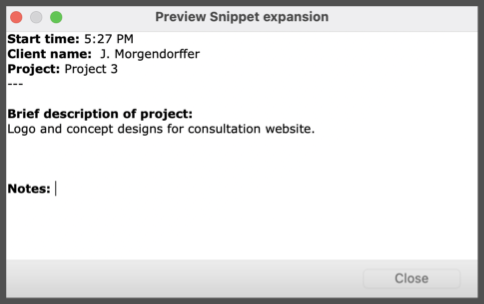
Snippets can be designed to include editable fields within static content. These elements can be included in tandem with automated expanders like time, date, or another Snippet.
The example below demonstrates how a user might use the “Time”, several variations of the “Field”, and “Cursor” options to create a simple form.
Snippet content with several elements added:
Text expansion preview:
Elements filled out within expansion:
Completed Snippet expansion result:
Back up aText data
As Snippets are added and customized, a user may wish to keep backups of their overall aText setup. Exporting and importing data also allows users to share their Snippets with others or receive Snippets others have created.
Export
There are several ways to export aText data. The best option depends on what the user would like to save, as well as how the user may like to later import their data.
Method 1: Save data as an .atext file
Create an .atext file from Data menu:
Click Data > Select “Backup” or “Backup to…” to name the file and select a specific location
Note: To access backup files, select “Restore…” from the Data
Create an .atext file from the “File” menu:
Click “File” > “Save…” to name and save the file to the desired location
Method 2: Save data as a Rich Text Format (RTF) document
When aText data is saved as an RTF, a user will be able to see all Snippets from the selected Groups that were exported. This allows users to conduct a word or phrase count within the entirety of the Snippets.
Export all Groups as an RTF document:
Click Data > Select “Export All Groups to RTF document…” to name and save the file to the desired location
⚠️ Warning: RTF files cannot be imported back into aText unless done so manually. ⚠️
Export individual and specific Groups:
-
Ensure that each Group to be exported is sorted back-to-back
-
Click the folder icon or title of the top or bottom Group
-
Hold shift and click on the additional Groups to be exported
-
Release the shift button
-
Click Data
-
Select “Export Group to RTF document…”
-
Name and save the file to the desired location
Import
Another user may choose to share an .atext file with someone who would like to add the Snippets inside it to their own collection. This can be accomplished using one of two import methods.
⚠️ Warning: Never accept or import files from unknown sources. ⚠️
Import from aText:
-
Click Data
-
Select “Import Data…”
-
Locate the desired
.atextfile and click “Open”
Import directly from an .aText file:
Double click the .atext file > Determine whether to “Import” the file (add to existing data) or “Restore” the file (replace existing data)